
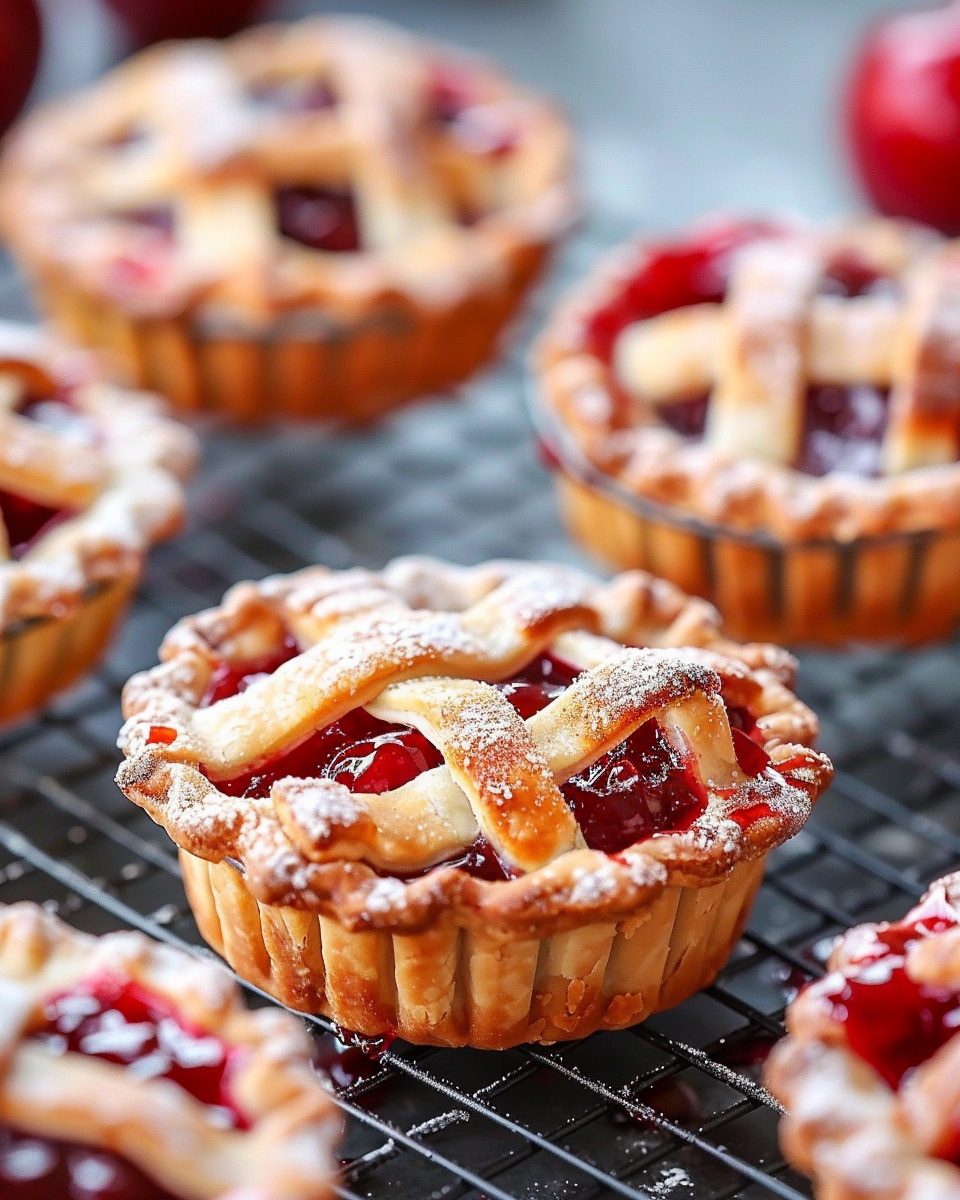
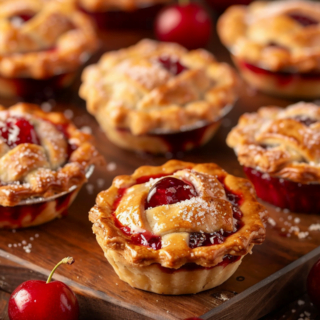
These Easy Mini Cherry Pies are perfect for any occasion. They are simple to make, adorable, and packed with delicious cherry filling. Let’s get baking!
Why You’ll Love This Easy Mini Cherry Pies?
- Cute and Portable: Perfect for parties, picnics, and gatherings.
- Simple Ingredients: Uses store-bought or homemade pie crust and cherry pie filling.
- Customizable: Add your favorite decorations or lattice crust for a beautiful finish.
- Quick and Easy: Ready in about 45 minutes from start to finish.
Ingredients Easy Mini Cherry Pies
- 2 pie crusts, homemade or store-bought
- 4 cups cherry pie filling
- 1 large egg, whisked with 1 tablespoon water
- Sanding sugar (optional)
Directions:
- Preheat the Oven:
- Preheat your oven to 425°F. Grease a 12-count muffin pan or two 6-count muffin pans with cooking spray.
- Prepare the Dough:
- Roll out the dough until it is ¼-inch thick. Using a 4-inch cookie cutter, cut out as many circles as you can. Re-roll the dough and cut out additional circles until you have a total of 12.
- Form the Pie Crusts:
- Arrange each circle in a muffin tin cup, pressing it down and up the edges. Keep any dough scraps for the top lattice or decorations.
- Fill with Cherry Filling:
- Fill each cup until nearly full, about ¼ cup, with cherry pie filling.
- Create the Top Crust:
- Use the remaining dough to create a top crust to cover each pie. To make a lattice crust, use a knife or pizza cutter to cut out thin strips of dough, then lace together to form a lattice.
- Brush with Egg Wash:
- Brush the tops of the pies with the egg wash, then sprinkle them with sanding sugar if desired.
- Bake:
- Bake the pies until they are golden brown, about 20 to 25 minutes.
- Cool and Serve:
- Remove the pies from the oven and let them cool completely in the muffin tin. Using a sharp knife, run it around the edges of each pie to help release them, then serve.
Notes:
- Lattice Crust: For a beautiful lattice crust, weave the dough strips over and under each other before placing them on top of the pies.
- Extra Filling: If you have extra cherry pie filling, serve it as a topping for ice cream or yogurt.
- Make Ahead: These pies can be made a day in advance and stored in an airtight container at room temperature.
Variations:
- Different Fillings: Use apple, blueberry, or peach pie filling instead of cherry.
- Cinnamon Sugar: Sprinkle a mixture of cinnamon and sugar on top instead of sanding sugar.
- Mini Tarts: Use tart pans instead of muffin tins for a different shape.
Equipment:
- 12-count muffin pan or two 6-count muffin pans
- Rolling pin
- 4-inch cookie cutter
- Sharp knife or pizza cutter
- Pastry brush
Storage:
Store any leftovers in an airtight container at room temperature for up to 2 days or in the refrigerator for up to 4 days. Reheat in the oven or microwave before serving.
What to Serve with This Easy Mini Cherry Pies ?
These mini cherry pies are delicious on their own, but they also pair wonderfully with a scoop of vanilla ice cream or a dollop of whipped cream.
Tips:
- Even Crust: Roll out the dough evenly to ensure uniform baking.
- Cooling: Allow the pies to cool completely in the muffin tin to make removal easier.
- Prevent Overflow: Do not overfill the pies to prevent the filling from bubbling over during baking.
FAQ:
Q: Can I use homemade pie crust instead of store-bought?
A: Absolutely! Homemade pie crust works great and can add a personal touch to your pies.
Q: Can I freeze these mini pies?
A: Yes, you can freeze the baked pies. Let them cool completely, then store them in an airtight container in the freezer for up to 2 months. Thaw and reheat before serving.
Q: Can I use a different type of fruit filling?
A: Yes, you can use any type of pie filling you like, such as apple, blueberry, or peach.
Please remember to SHARE on Facebook and PIN IT!
FOLLOW ME ON PINTEREST BY CLICKING HERE <——
★ If you make this recipe, please leave a comment and give it a star rating. I would love to know how you liked it!
📖 Recipe
Easy Mini Cherry Pies
Ingredients
- - 2 pie crusts homemade or store-bought
- - 4 cups cherry pie filling
- - 1 large egg whisked with 1 tablespoon water
- - Sanding sugar optional
Instructions
- Preheat your oven to 425°F. Grease a 12-count muffin pan or two 6-count muffin pans with cooking spray.
2. Roll out the dough until it is ¼-inch thick. Using a 4-inch cookie cutter, cut out as many circles as you can. Re-roll the dough and cut out additional circles until you have a total of 12.
3. Arrange each circle in a muffin tin cup, pressing it down and up the edges. Keep any dough scraps for the top lattice or decorations.
4. Fill each cup until nearly full, about ¼ cup, with cherry pie filling.
5. Use the remaining dough to create a top crust to cover each pie. To make a lattice crust, use a knife or pizza cutter to cut out thin strips of dough, then lace together to form a lattice.
6. Brush the tops of the pies with the egg wash, then sprinkle them with sanding sugar if desired.
7. Bake until golden brown, about 20 to 25 minutes.
8. Remove from the oven and let cool completely in the muffin tin. Using a sharp knife, run it around the edges of each pie to help release them, then serve.
Notes
Approximate Nutrition Information:
- Calories: 200 kcal per serving
- Total Fat: 10g
- Saturated Fat: 3g
- Cholesterol: 20mg
- Sodium: 150mg
- Total Carbohydrates: 28g
- Dietary Fiber: 1g
- Sugars: 15g
- Protein: 2g

Leave a Reply